Following on from my review of the Smoked Palette, I've decided to do a version of the classic smoky eye.
I've been in a purple/mauve/pink beauty mood for the last week. Every look I did was soft, pretty and purple-based. Then I saw this picture of Kristen Stewart the other day (below) and I couldn't help but admire her smoky eye makeup.
It's flawless. Smoky eye, perfect skin and a neutral lip. When I do my makeup, I like to add a bit more colour to the cheeks, but that's about it.
 |
| Original pic from Just Jared, http://www.justjared.com/photo-gallery/2718897/kristen-stewart-on-the-road-nyc-screening-05/, this version cropped from http://hollywoodlife.com/2012/09/21/kristen-stewart-locket-robert-pattinson-love/ |
Everyone loves a smoky eye but it can be difficult to do. So many beauty blogs, videos and magazines try to tell you that all you have to do is apply eyeliner close to the lash line and smudge it out to the crease and viola! there's your smoky eye. I tried that, many times, and it never worked for me. All I got was an asymmetrical eye look with smudgy, streaky black eyes that said "I just got in a fight"- definitely not the look I was aiming to create.
There are a couple of ways I know how to do a smoky eye, but for this look I followed the instructions from the Urban Decay Get The Look Book for the "Iconic" smoky eye using the Urban Decay Smoked Palette.
I won't be re-printing their instructions (that's plagiarism) but I will give you the sequence (with some minor changes) and the products used in my own words.
I have to admit I made a mistake, I used UDPP in Greed (it's the one I have open at the moment) and in these pictures, the gold shines through. It only looks that way on camera, in real life there's no gold to be seen through the eyeshadow. My apologies. I might update this post some other day, using the UDPP in Original as a base instead.
Here's the look:
 |
| Closed eyes with a smoky eye look. |
 |
| Smoky eye look. This doesn't do a great job of showing the change in the intensity of eyeshadows in this look. |
 |
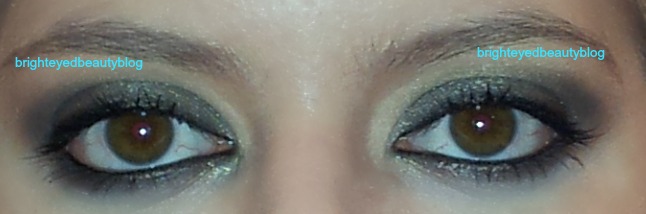
| Smoky eye look. I think this picture captures the change in intensity from lash line out to the crease the best. |
 |
| Smoky eye up close |
How-To:
- Prime lids with UDPP in Original (again, I used Greed, but that was a mistake in terms of photography);
- Apply Freestyle eyeshadow from the crease up to the eyebrow;
- Apply Kinky eyeshadow just under the eyebrow as a highlight;
- Line the outer half of the upper and lower lash lines with UD 24/7 Glide-On Eye Pencil in Perversion and smudge it;
- Apply Mushroom eyeshadow over the liner you just applied on the upper and lower lash lines and make sure to blend out your eyeshadow so the edges are soft;
- Apply Mushroom eyeshadow on the mobile lid and blend it up and out of the crease, so the shadow is strongest at the lash line and lightest above the crease;
- To add depth to your eye look, apply Backdoor eyeshadow to the outer 1/3 of the mobile lid and wing it out slightly, blending it into the Mushroom shadow you've applied in the crease;
- Apply Backdoor to the outer half of the lower lash line, keeping very close to the lashline (like another thin layer of eyeliner) and join it up to the Backdoor eyeshadow you winged out on the top lash line;
- Re-line the eyes (top and lower lash lines) with Blackout eyeshadow, keeping close to the lash line and winging it out a bit at the outer corner and smudging it so it melts into Backdoor;
- Using Perversion eyeliner, add some black eyeliner to the outer 1/3 of the eye. I used a cotton tip to smudge it into the shadow there. This basically makes the outer corner blacker- you don't have to use the liner, you could just use Blackout;
- Keeping very close to the lashline, line your eyes with Perversion eye pencil and tightline;
- CLEAN UP!
- This look creates a LOT of fallout. You need to wash your face to get rid of all of it.
- I added translucent powder under the lower eye eyeshadow, to stop the eyeshadow from travelling.
The main thing I learnt from this experience is that following someone else's instructions can be nerve-wrecking. I know that even if my eye look looks awful half way through, I have a plan, and it'll look alright in the end. Going through the "ugly" phases of creating an eye look without being sure of what the next step is, or how it'll look was difficult.
Sorry for all the text!
xo
Anna
No comments:
Post a Comment
Please comment- I would love to hear from you!